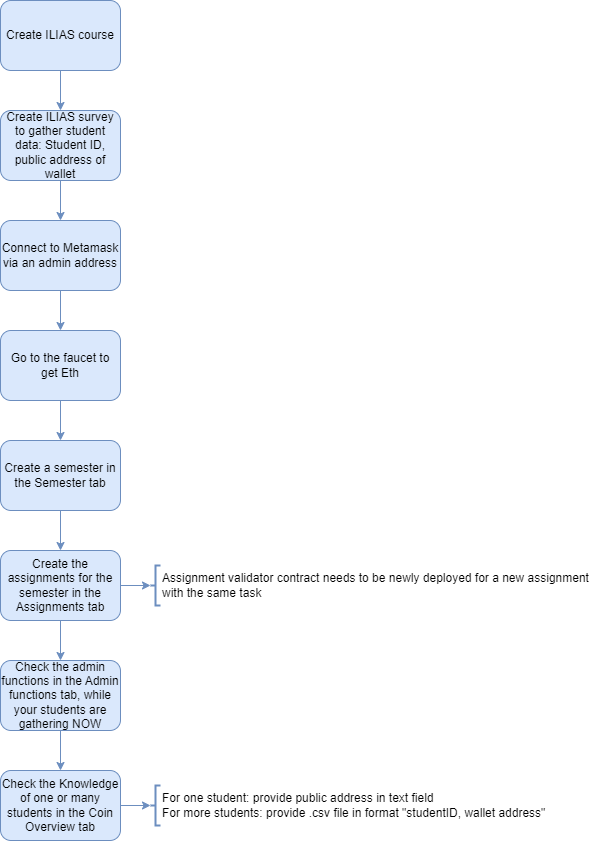
How to start with a new semester
This will be a step-by-step guide on how you get a new semester with new students up and running. If you want a short overview of the process, please scroll down to the end of this page to look at a flow chart of the process. If you want to learn more about the admin functions, please check the Admin functions page.
Step 1: Log in as admin on Knowledge Base
To be able to see all the admin functions to create a new semester on Knowledge Base you have to log in with your Metamask account that is registered as an admin account.
Step 2: Create a new semester on Knowledge Base
To create a new semester on Knowledge Base you have to go to the Semester section and click on the button "Create new semester". Then you are asked to type in the following information:
-
Type in the name of the semester.
-
Specify the starting block of the assignment. The students won´t see a time slot for the assignment but only the starting and end block. Students have to manually calculate the time slot for the assignment.
-
Specify the end block of the assignment.
-
Provide the coin amount that is needed to be qualified for the exam.
Then press the "Create semester"-Button. The semester is now created, and you can add assignments to it. You should be able to see the new semester in the semester overview. The list is sorted, so that the newest semester is on top.
Step 2.1: Change a semester on Knowledge Base
You can change every parameter of a semester, so name, starting block, end block and coin amount needed for the exam. But please be careful when changing the starting block or the end block of a semester when you already created assignments for it, because, the assignments should still be in the same time slot as the semester. Knowledge Base will give out a notification if you would cause an assignment to be out of the time slot of the semester, once you tried to save the changes. You need to change the timeslot of the affected assignments first, before you can change the timeslot of the semester.
Step 3: How to deploy a new validator contract
If you want to create a semester with new assignments, there need to be validator contracts that check the solutions that are submitted by the students. To deploy such a validator contract you have to
TODO
Step 4: Create assignments or on Knowledge Base
If you want to add a new assignment on Knowledge Base you have to go to the section "Assignments" and press the "Add new Assignment"-Button. Then you are asked to type in the following information:
-
Select the semester you want to add the assignment to. Please keep in mind that the semester has to be created before you can add an assignment to it.
-
Type in the name of the assignment.
-
Provide the link to the assignment task. This link should lead to a pdf document which contains the instructions for the task of the assignment.
-
Insert the contract address of the contract that will validate the solutions handed in by the students. This contract should have been deployed by this point.
-
Specify the starting block of the assignment. The students won´t see a time slot for the assignment but only the starting and end block. Students have to manually calculate the time slot for the assignment.
-
Specify the end block of the assignment.
Then press the "Create assignment"-Button. The assignment is now created, and you should be able to see it in the assignment overview.
Keep in mind, that it is not possible to create a new assignment with a validator contract that is already used by another assignment. You can use the same code, but need to deploy it again, so that it has a different address.
Step 4.1: Change an assignment on Knowledge Base
You can change every parameter of an assignment, so name, link to the task, contract address, starting block and end block. But please be careful when changing the starting block or the end block of an assignment, because, the assignment should still be in the same time slot as the semester. Knowledge Base will give out a notification if you would cause an assignment to be out of the time slot of the semester, once you tried to save the changes.
Step 5: Create a survey on ILIAS
To gather the needed student data and comply to the data privacy rules of the University of Mannheim you have to use ILIAS as a data source. To do so, you have to create a survey on ILIAS. The survey should contain the following questions:
-
What is your student id at University of Mannheim? (Matrikelnummer)
-
What is the public address of your Metamask wallet? (The students need to have set up a Metamask wallet before they can provide this information.)
Step 6: Upload the student data to Knowledge Base
Once the survey on ILIAS is completed, you can export the results as csv. Now you can either check the Knowledge of one student or many students at once.
To check the Knowledge of one student, you have to go to the section "Coin overview" and type in the student id (optional) and the wallet address of the student. The student id is optional, but can be used for convenience to have a better overview.
To check the Knowledge of many students at once, you have to upload a csv file with the student data. The csv file needs to have the format "student id,wallet address". You also have the option to download an example csv file. To upload a file, click the "Choose file"-Button and select the csv file you want to upload. Then press the "Check Knowledge of course"-Button. You will get a csv file back with the following information:
-
student id
-
wallet address
-
Current Knowledge
-
Passed or failed
-
Knowledge per assignment