Knowledge Base Setup for Developers
Smart Contracts
Deploy smart contracts to local chain
Deploy contracts to chain using truffle.
-
Optional: Only recompile the contracts if you did some changes to the contracts
truffle compile. The contracts are already compiled and can be found in thebuildfolder. The frontend needs to have the contracts compiled in order to work. -
Deploy contracts
truffle deploy
Smart Contract Usage
In total the project has two major smart contracts:
-
ConfigStorage: Stores all necessary config parameters for the system to properly operate -
FaucetStorage: Functions that are necessary for operating the ethereum faucet
Further the project also has some smart contracts that are implicitly deployed on the chain via inheritance.
Three contract are used for this:
-
BaseAdmin: Admin related functions -
BaseAssignment: Base functions that every assignment contract (from the students) needs -
BaseValidator: Base functions that every assignment validator contract (from the instructor) needs
Base Contract usage
A base contract can be easily imported into any other smart contract by importing the .sol file and referencing the file.
Example:
import "../contracts/BaseAdmin.sol";

contract ConfigStorage is BaseAdmin {
    ...
}
In this example the ConfigStorage smart contract inherits any function that the BaseAdmin class owns.
Development of custom assignment validators
To develop custom assignment validators two parts a necessary.
Part 1 - Assignment interface:
First of all the instructor needs to write a smart contract which owns all the necessary functions to test the smart contract as virtual functions.
This file can then be inherited by the student and by the validator contract.
An example interface file is shown here:
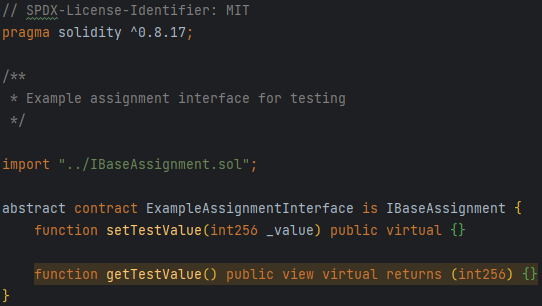
As you can see, the functions have no content and use the virtual keyword.
Therefore, the students do not get help to solve the assignment but get a skeleton to implement the necessary functions/methods.
Part 2 - Assignment Validator contract:
Secondly, the instructor needs to create the necessary validation contract.
To ensure that each validation contract follows the same guidelines as the others, the validation smart contract needs to inherit the BaseValidator contract.
This base contract, offers an interface that every assignment validator contract needs.
An example usage of the smart contract can be seen in the ExampleAssignmentValidator.
Example
The ExampleAssignment contract is a mock assignment with some simple functions.
This contract is an example, just like the students would deploy to the blockchain.
The instructor needs to develop an interface contract which is in our case the ExampleAssignmentInterface.
As you may see, the functions are not implemented and marked as virtual.
But they allow the ExampleAssignmentValidator contract to call the necessary functions for every contract which inherits the ExampleAssignmentInterface.
Using the frontend it is possible to test the deployed ExampleAssignment by taking the address of the person who deployed the ExampleAssignment (should be the student address) and the address of the ExampleAssignment smart contract.
Using these two parameters and the address of the validation contract it is possible to test any implementation of the ExampleAssignment contract (as long as the functions are implemented).
Frontend
Frontend & smart contracts
To properly use the frontend the corresponding smart contracts have to be deployed to the chain. The documentation on how to deploy the smart contracts to the chain can be viewed here.
Faucet
Faucet & smart contracts
To properly use the frontend the corresponding smart contracts have to be deployed to the chain. The documentation on how to deploy the smart contracts to the chain can be viewed here.