Basic Raspberry Pi setup
Tools needed
-
Raspberry Pi
-
SD card
-
SD card reader
-
Ethernet cable or WiFi
-
USB keyboard
-
USB mouse
-
Micro HDMI to HDMI/Display port cable or adapter
-
USB-C power supply cable
-
Own PC
Installing the imager on a SD card
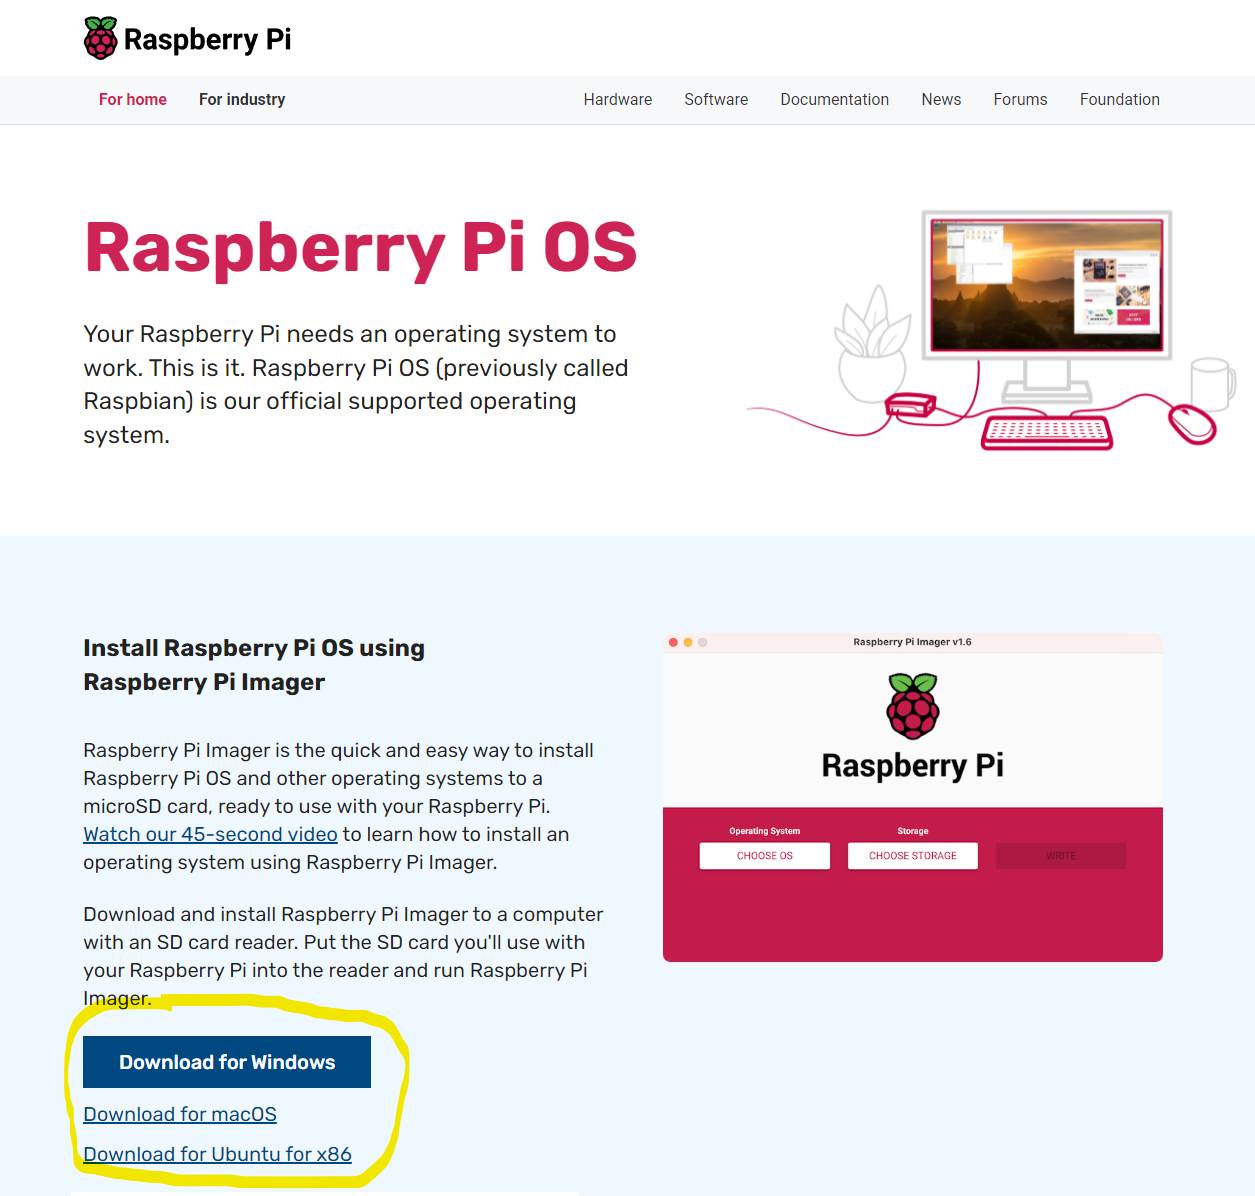
To install the Raspberry Pi OS on the Pi´s you need to have the Raspberry Pi imager installed on your PC. For this, visit the website: https://www.raspberrypi.com/software/. Here you can choose the right download according to your operating system:
Once downloaded you see a screen like this:
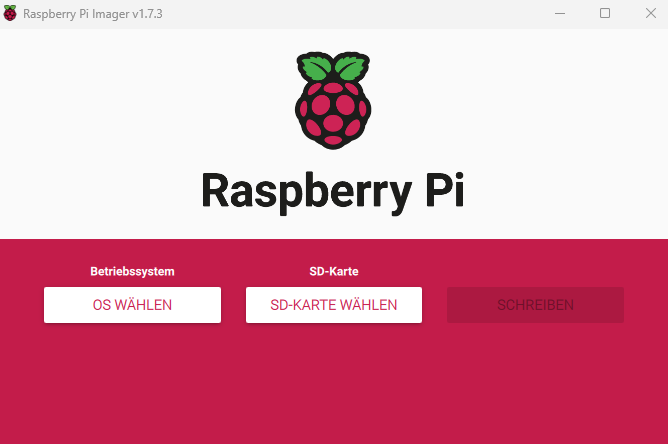
You then need to put your SD card in your SD card reader. Then you need to select the OS you want to install on your Pi´s, which is the following:
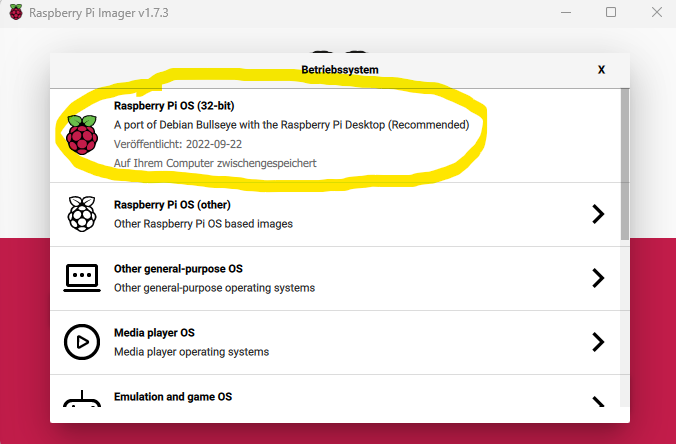
Then you need to select the SD card you put in your SD card reader. When you have done this, you can click on the "Write" button to start the installation process. After some time, the imager will tell you that the installation was successful, and you can remove the SD card from the SD card reader.
Setting up the Raspberry Pi hardware
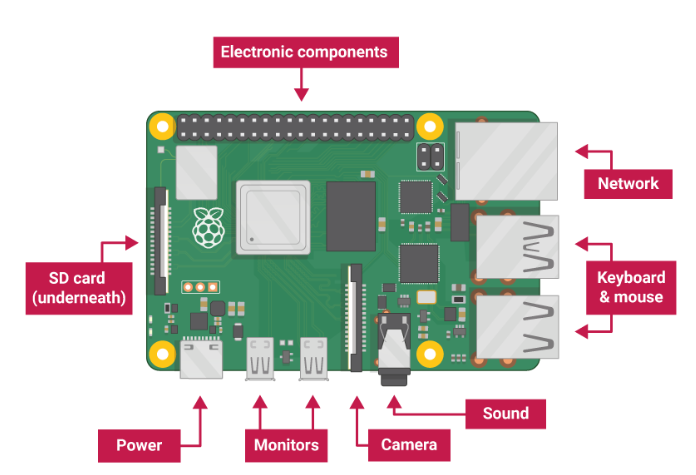
Please follow the instructions on how to put the Raspberry Pi together which are in the packaging of the Pi. A picture of all the possible connection points is shown here:
After you have put the Pi together, you need to connect the Pi to the fitting power supply. You will also need to plug in the micro HDMI cable to the Pi and connect it to a display. You will also need to connect the Pi to an ethernet cable if you choose this over a WiFi-Connection. You eventually also need to plug in a USB keyboard and mouse to interact with the Pi. Lastly you can insert the SD card in the SD card slot of the Raspberry Pi. Please keep in mind to insert it in the right way, so that the gold contacts are facing the Pi. Once all of this is done you can start the software setup process of your Raspberry Pi.
Setting up the Raspberry Pi software
When you turn on your Raspberry Pi with all the things plugged in as described in the step before, you will see a welcome screen. Then you have to press "Next".
Then you have to set the country, by choosing "Germany" for the country. Language should then automatically be set to "German" and Timezone to "Berlin". If not, please change it manually. Please check the box for "Use English Language". Then press "Next".
You are then asked to create a user by providing a username and password. This information is given to the admin/lecturer beforehand. Then press "Next".
Now you can set up the screen if it us not shown correctly. You can either switch the toggle and click "Next" or if the screen is shown correctly just press "Next".
If you have decided for a Wifi-Connection, you now have to select your Wifi-Network and press "Next". Then you need to provide the WiFi-Password and press "Next".
Once done, you are asked to update the software. Please press "Next" to do this. This eventually takes a while.
After this is completed you see the setup Complete screen, and you have to press "Restart". The Raspberry Pi will now restart, and you will see the desktop of the Pi.
You now have to click on the raspberry icon in the top left corner and select "Preferences" and then "Raspberry Pi Configuration". Then you have to select "Interfaces" and enable "SSH". Then press "OK". Also in the configuration window, go to Localisation and set the keyboard layout to "German". Then press "OK".
Updating the Raspberry Pi software
To update the software on the Raspberry Pi, you need to open a terminal window. You can do this by clicking on the raspberry icon in the top left corner and selecting "Accessories" and then "Terminal". Then you need to type in the following command:
sudo apt-get update && sudo apt-get full-upgrade
and press enter. This will update the software on the Raspberry Pi. This will take a while. Once it is done, you can close the terminal window. Please do this in the initial setup and also regularly to keep the software up to date. This is especially important for security reasons.
Changing the default SSH port
This step is optional, but recommended. To change the default SSH port, you need to open a terminal window. Then you need to type in the following command:
sudo nano /etc/ssh/sshd_config
and press enter. This will open the sshd_config file in the nano editor.
Now you need to find the line that says "#Port 22" and change it to "Port <port>". You need to replace <port> with the port you want to use for SSH. This port needs to be different from the ports you want to open for the faucet and the frontend. Then press "Ctrl + X" to exit the editor. Then press "Y" to save the changes.
Now you need to restart the SSH service by typing in the following command:
sudo service ssh restart
and press enter. This will restart the SSH service.
Access the Raspberry Pi via SSH
You can either work on the raspberry pi directly via the display or you can access it via SSH on your PC. To access the Raspberry Pi via SSH, you need to open a terminal window, but this time on your own PC. Then you need to type in the following command:
ssh <username>@<ip-address> -p <port>
and press enter. You need to replace <username> with the username you created in the initial setup, <ip-address> with the IP address of the Raspberry Pi and <port> with the port you chose for SSH.
Getting the IP address of the Raspberry Pi
If you don´t already know the IP address of the Raspberry Pi, do the following: To get the IP address of the Raspberry Pi, you need to open a terminal window on the Raspberry Pi and type in the following command:
ifconfig
and press enter. You will see a lot of information about your Pi. In the wlan0 (for WiFi) / eth0 (for ethernet connection) section you will see the IP-Address of your Pi after "inet".
Installing a firewall
To install a firewall on the Raspberry Pi, you need to open a terminal window. You can do this by clicking on the raspberry icon in the top left corner and selecting "Accessories" and then "Terminal". Then you need to type in the following command:
sudo apt-get install ufw
and press enter. This will install the firewall on the Raspberry Pi.
Now the ports you want to open need to be configured. You can do this by typing in the following command:
sudo ufw allow <port>
and press enter. You need to replace <port> with the port you want to open. You can do this for every port you want to open. Depending on the purpose of the Pi, you need to open ports for the following services:
-
Faucet API
-
Frontend
-
SSH (the port you chose in the step: Changing the default SSH port)
-
Chain P2P connection
-
Chain RPC API
Once you are done, you can type in the following command to list all the ports you have opened:
sudo ufw show added
and press enter. This will show you all the ports you have opened.
Now you can enable the firewall by typing in the following command:
sudo ufw enable
and press enter. This will enable the firewall.
To check if the firewall is enabled, you can type in the following command:
sudo ufw status
and press enter. This will show you the status of the firewall.
Installing Fail2ban
To make the Pi more secure, you can install Fail2ban. Fail2ban is a tool that detects brute-force attacks and blocks them. It blocks the IP address of the attacker after five failed login attempts for a certain amount of time.
To install Fail2ban, you need to open a terminal window. Then you need to type in the following command:
sudo apt-get install fail2ban
and press enter. This will install Fail2ban on the Raspberry Pi.
Now you need to configure Fail2ban. You can do this by typing in the following command:
sudo nano /etc/fail2ban/jail.conf
and press enter. This will open the jail.conf file in the nano editor. Here you can change the ban time by changing the value of "bantime" to the amount of time you want to ban the attacker. You can also change the amount of failed login attempts before the IP address is banned by changing the value of "maxretry" to the amount of failed login attempts you want to allow. For more information on the configuration of Fail2ban, please visit Fail2Ban manual. Then press "Ctrl + S" to save the changes. Then press "Ctrl + X" to exit the editor.
Now you need to restart Fail2ban by typing in the following command:
sudo service fail2ban restart
and press enter. This will restart Fail2ban.